
Over the years, I’ve come to appreciate a well-lit garage. Whether it’s an oil change or ripping lumber on the table saw, proper lighting prevents me from putting my hands where they shouldn’t be. It’s also a whole lot easier to find errant nuts and bolts when I drop them.
However, selecting the right setup is tough and there is a lot to consider. Immediately obvious are things like the number of light fixtures, their dimensions, and how to install them. Other things like lumen, color temperature, energy consumption, and the type of light itself may not be as evident and are also important.
But you don’t need to be an engineer to grasp these concepts. If you know what your requirements are then determining the quantity and quality of light should be straightforward once you’ve gained a bit of knowledge. And, this guide will cover the aforementioned topics, thoroughly.
Before you get bogged down by the details, I want to give you a good idea of what’s available. I’ve listed ten options that represent the absolute best garage lighting solutions on the market based on my personal experience and recommendations of others.
Sunco Lighting LED Shop Light
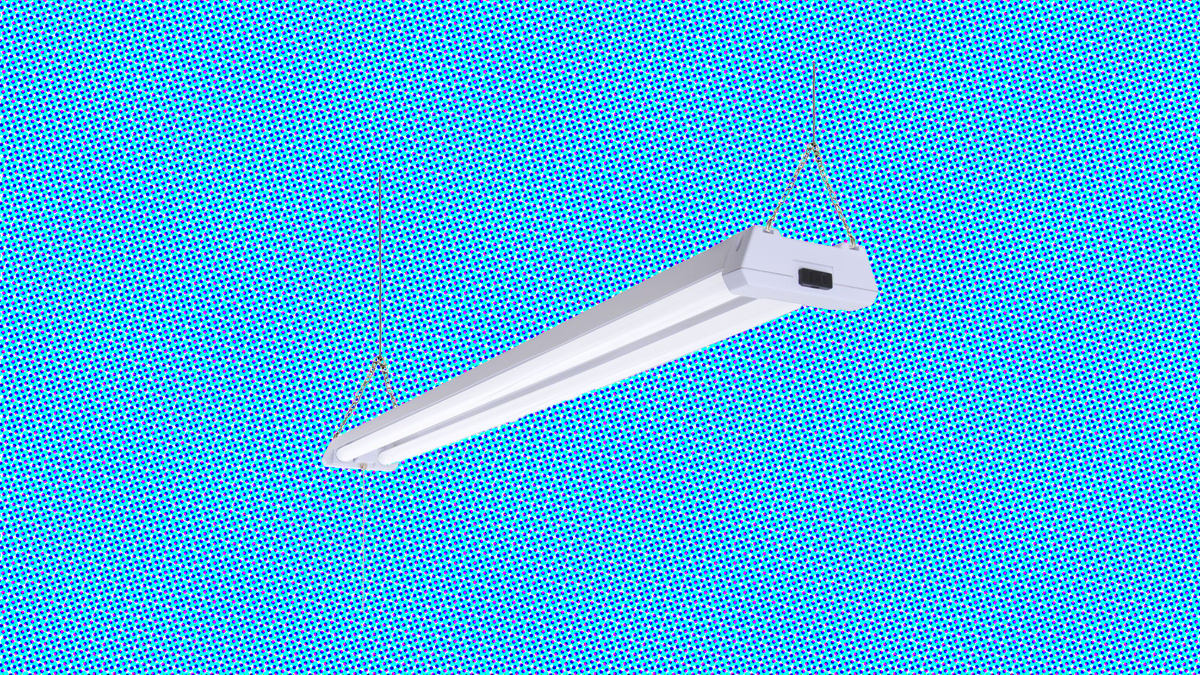
The Sunco Lighting LED Shop Light is a superb option for any garage but especially large or tall rooms that require adjustable and linkable fixtures. These lights are powerful and let you fine-tune the height based on the conditions and add more light where necessary.
They also offer a ton of installation options and the included hardware makes hanging them a breeze. In addition to the fixture itself, you get drywall anchors, ceiling hooks, suspension cables, and mounting chains.
Beyond that you will need a drill and possibly a screwdriver to complete the job. No extra wiring is needed as the fixture can be plugged in using the integrated power cord and up to four lights can be linked together.
Each energy-efficient LED fixture is 48″ long, 6″ wide, and outputs 4,000 lumens at 40 watts, which is enough light for around 100 square feet. They are available in 4000K or 5000K color temperature depending on your preference. Color Rendering Index (CRI) is unlisted but likely rated around 80.
The 50,000 hours rated lifespan is exceptional and Sunco provides a five-year unlimited warranty against all defects. Your lights should operate worry and maintenance free for a long time to come.
Learn More HereAmico Linkable LED Shop Light
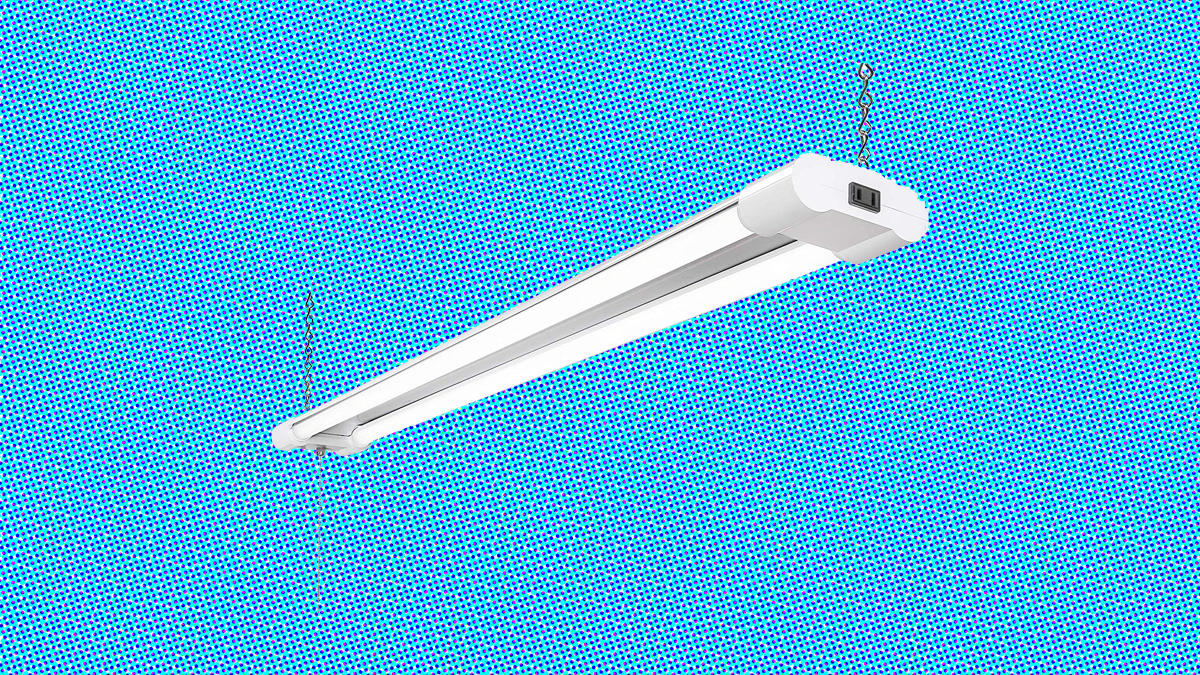
The Amico Linkable LED Shop Light comes highly recommended and many people report better than expected performance, especially when you consider the price. A single light costs around $33, and, when bought in a package of six, that price comes down to $23 per light.
Each fixture comes with drywall anchors, ceiling hooks, and suspension cables for quick and easy installation with only a drill. An integrated power cord lets you link up to ten units together without hardwiring, so it’s strictly a plug-and-play affair.
The fixture measures approximately 48″ long, 5″ wide, and outputs 4,000 lumens at 42 watts, which is enough light for about 100 square feet. It’s only available in 5000K color temperature and Color Rendering Index (CRI) is unlisted but probably around 80.
The LEDs have a rated lifespan of 50,000 hours and Amico offers a five-year unlimited warranty against all defects.
It’s also worth noting some users are reporting these lights to be brighter than expected. This may mean more power is being drawn than indicated by the manufacturer or the LEDs are more efficient.
Learn More HereBrightech LightPRO LED Shop Light
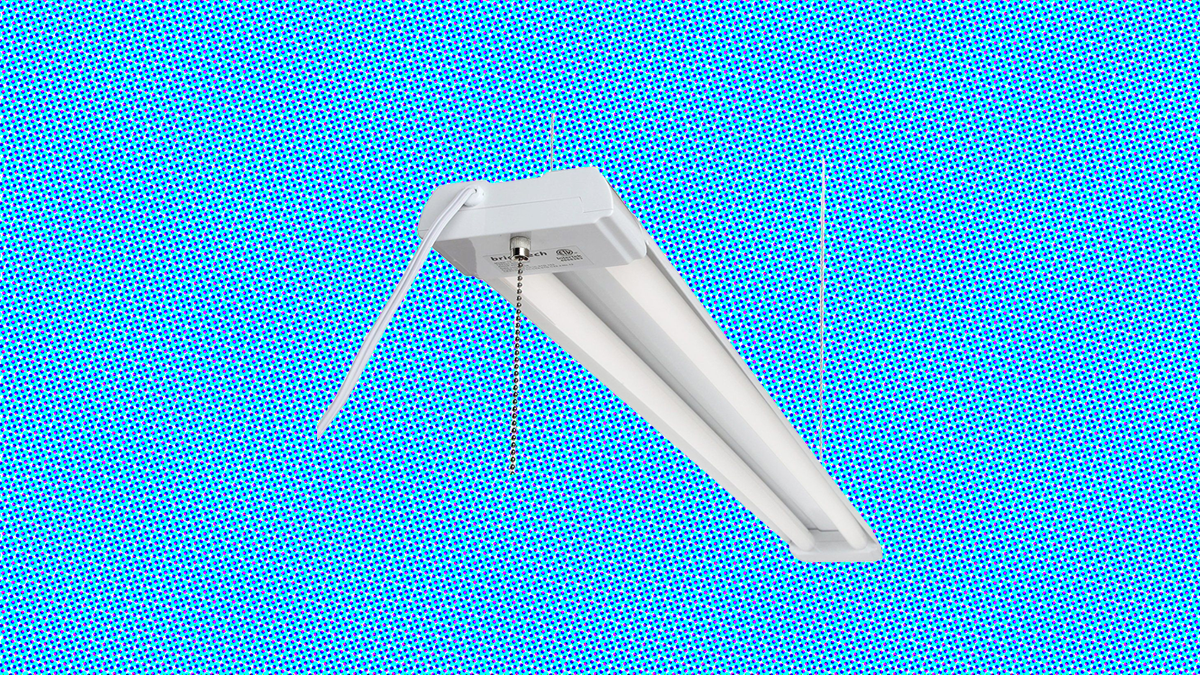
Brightech LightPRO LED lights require a proprietary installation kit and are not designed to link together like the Amico and Sunco Lighting fixtures. Still, they offer exceptional performance and if you have a small garage or enough outlets then this is a great option.
Each light measures 48″ long, 5″ wide, and output 4,000 lumens at 40 watts – good enough to illuminate around 100 square feet. They’re only available in 4000K color temperature and Color Rendering Index (CRI) is listed at 80.
The LEDs have a rated lifespan of 50,000 hours, which equates to about 20 years depending on your daily usage. In addition, Brightech offers a three-year unlimited warranty against any defects.
Each fixture comes with application specific anchors and suspension cables that are easy to install but a bit limited. After installing the cables you’re supposed to slide the end into the fixture, but there is no way to lock it in place. As such, the light can easily slide off creating a falling hazard. It may be worth screwing the light into the ceiling or rafters directly or using an adhesive to keep the cable in place.
Learn More HereHyperikon HyperSelect LED Shop Light
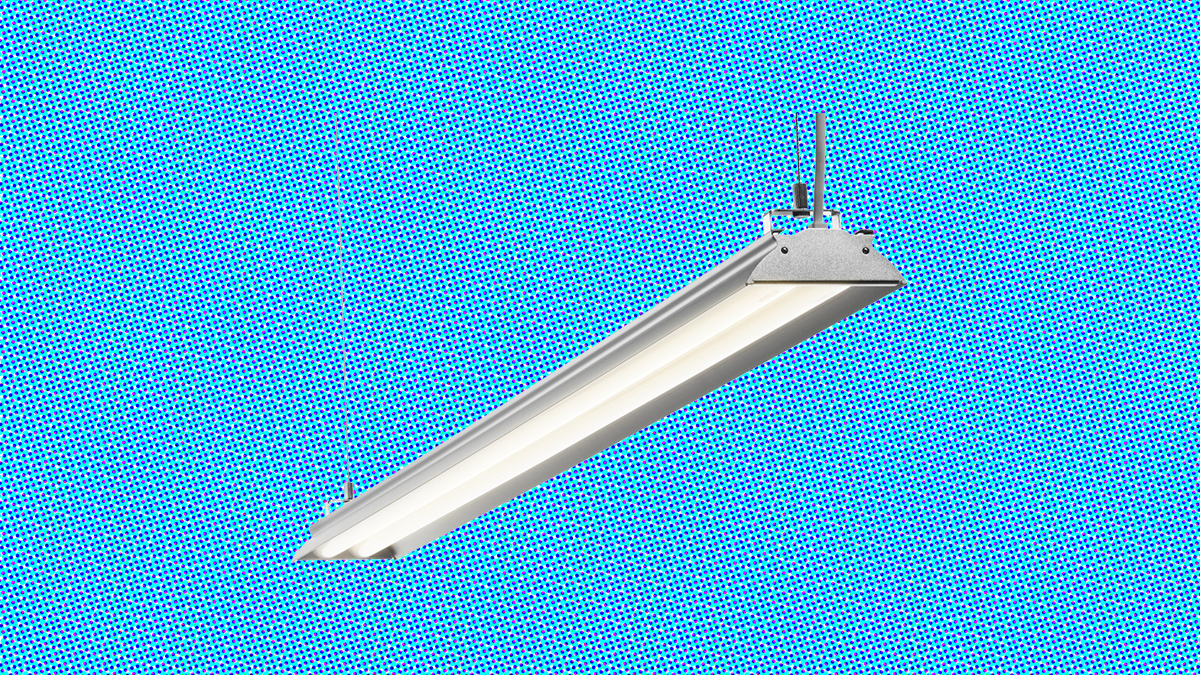
Completely built from unfinished aluminum, the HyperSelect LED shop light is rather industrial looking. But its tough and compact design makes it ideal for applications where a ton of light is needed but space is limited.
Each fixture measures 49″ long, 4″ wide, 2″ tall, and outputs 3,800 lumens at 35 watts. Though the output is a little less than others on this list, the efficiency is better and they still put out enough light to illuminate 95 square feet. They’re available in 4000K or 5000K color temperature and Color Rendering Index (CRI) is listed at 84.
The LEDs have a rated lifespan of 45,000 hours and Hyperikon offers a generous 5-year unlimited warranty against all defects.
In terms of mounting, this is one of the more secure and well-engineered solutions out there. With each fixture, you get a robust installation kit that includes drywall anchors, screws, mounting studs, suspension cords, suspension attachment, and U-bracket.
To install, simply drill a hole where you need it and install your drywall anchors, screws, and mounting stud. On one end of the suspension cord, attach your suspension attachment and U-bracket and on the other feed the cord through the threaded part of the mounting stud. Finally, adjust to the desired length and attach the bracket to the fixture and you’re all set.
Learn More HereGarage Lighting Buying Guide
Now that you explored a few options, you probably have more questions than answers. That’s par for the course since the terminology used to describe lights, like lumen and color temperature, is hardly part of a normal person’s vocabulary. Nonetheless, they are crucial concepts you need to understand before making a purchase.
The rest of this guide is dedicated to examining these ideas, in depth. And, perhaps more importantly, I’ll discuss how you can apply this knowledge so that you can choose the best garage lighting solution based on your particular situation.
By the end, you will have a solid understanding of light bulbs and their qualities. You’ll also know how to install your fixtures and how much light you need for your space.
Types of Light Bulbs
Technology has evolved considerably since the first commercially available light bulbs hit the market in the late 19th century. Today’s bulbs are much more durable and energy efficient.
While old-school incandescent bulbs are still widely used, they’ve fallen out of favor over the years. For many consumers, fluorescent, compact fluorescent (CFL), and light emitting diode (LED) lights are more appealing because they consume less energy, run cooler, and last longer.
With that said, each type of light has its own benefits and drawbacks or work better in certain scenarios. To get a better picture, let’s explore their properties in the subsequent sections.
Incandescent Lights
Incandescent lights work by passing an electric current across a wire filament and heating it to the point that it glows with visible light. The filament is typically protected from oxidation with a glass bulb that is filled with inert gas or under vacuum.
Since they are cheap to produce and available in many different sizes and outputs, they’re widely used for home and commercial lighting. They also produce a natural and flattering light, which makes them popular for photography and videography.
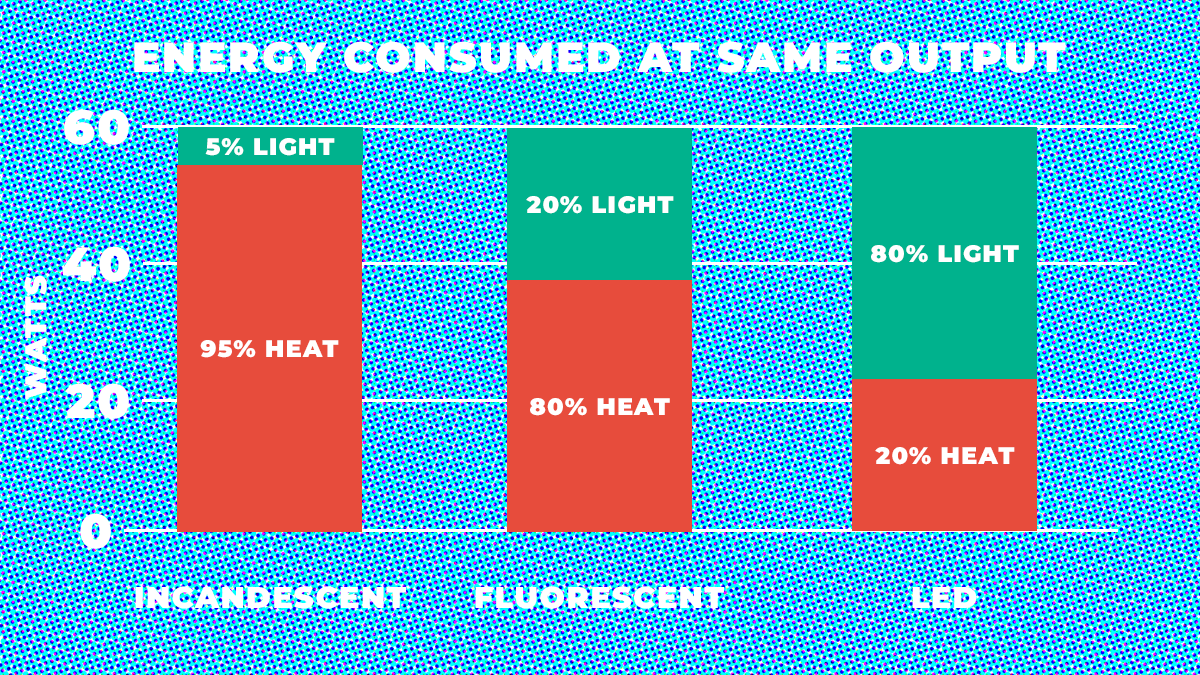
However, incandescent lights are very inefficient, converting less than 5% of the energy they use into visible light and only produce 16 lumens per watt. The rest of the energy is lost to heat.
They also have a comparatively short lifespan of around 1,000 hours. Over time the electric current evaporates enough of the filament that it brakes.
To extend the life of standard incandescent lights, halogen is sometimes added to the bulb. When coupled with a tungsten filament, a chemical reaction occurs that re-deposits the vaporized tungsten back on the filament. Halogen lights are still very hot and energy inefficient, however.
Overall, there isn’t a lot of upside to these types of lights when you compare them to other technologies. Simply put, they are hot and expensive to run. But if you are looking for a more natural light and are OK with the tradeoffs, it’s an option.
Fluorescent Lights
Fluorescent lights work by passing an electric current through a mercury vapor-filled gas tube. When the electrons in the gas become excited, they produce short-wave ultraviolet light that is converted to visible light by a phosphor coating on the inside of the tube.
In terms of efficiency and heat, fluorescent lights are a significant improvement over the incandescent light. Typical fluorescent lights produce between 50 and 70 lumens per watt, whereas incandescent lights sit around 16 lumens per watt. They also convert around 22% of input power into visible light compared to 5%, meaning a lot less energy is turned into heat.
Fluorescent lights have a long service life, too, and will last 10 to 20 times longer than an equivalent incandescent light when operated several hours at a time. Under typical conditions, they have a 10,000+ hour service life.
There are two big downsides to fluorescent lights that you should consider as well. First, they require an electrical ballast, which increases the initial cost of fluorescent light fixtures significantly. Improved efficiency and long service life, however, should offset these costs over time.
Second, fluorescent bulbs contain mercury, which, in high amounts, is very toxic. It is especially harmful to babies and small children. As such you need to handle fluorescent lights with care and dispose of them properly.
It’s also worth mentioning compact fluorescent lights (CFLs), which are an energy efficient alternative to incandescent bulbs designed to fit in the same light fixtures. Functionally, they are identical and have the same features and drawbacks.
LED Lights
LED lights are very popular and the market is expected to grow 12 fold to $25 billion by 2023. They are much more efficient than incandescent or fluorescent lights, and, since they don’t need dangerous elements like mercury, are decidedly better for the environment.
As a commercial and residential lighting solution, LED’s are a relative newcomer. Previous iterations were exceptionally compact but relatively inefficient or prohibitively expensive making them nonviable as an alternative to incandescent and fluorescent lights.
Advances over the last decade, however, have driven down costs to a fraction of what they once were while increasing the quantity and quality of light at the same time. Now, they’re not only viable but recommended in many cases.
LED lights are a type of solid-state lighting and operate in a different way than conventional lights. Each LED has two leads and when a voltage is applied electrons are able to recombine with electron holes within the device. This process releases energy in the form of visible light.
Typical LED tube lights easily produce upwards of 100 lumens per watt with 200 lumens per watt models on the horizon.
Energy Consumption
A Watt is a unit of measurement that quantifies how much energy is transferred. For decades, this was the key metric we looked at when choosing a light bulb. We know that a standard household light bulb draws 60 watts, so if we need more light we simply select a higher wattage bulb.
With the advent of new lighting technologies, however, we can’t rely on this metric alone. Instead, we have to apply a concept called luminous efficacy, which is measured in lumens per watt and gives us an accurate representation of a light’s efficiency.
Since an efficient bulb will produce more light, use less electricity, and generate less heat, it stands to reason that a bulb with a high luminous efficacy is preferable. Right now, LEDs offer the best luminous efficacy with around 100 lumens per watt versus 16 lumens per watt for incandescent bulbs.
To get an idea of how much this will save you, we can do a few simple calculations. If we run a standard 60W incandescent light bulb for 4 hours a day, we will use around 240 Watt-Hours of energy (60W * 4 Hours = 240 Watt-Hours.) If we do this every day, over the course of a year we will consume 87,600 Watt-Hours, or 87.6 Kilowatt-Hours, of energy (240 Watt-Hours * 365 Days = 87,600.) In my area, 1 Kilowatt-hour of electricity costs 1.971 cents so in one year our cost to run a 60W incandescent light bulb is around $1.73.
An LED light that produces the same amount of light will only use around 8 Watts of electricity so our costs will be significantly less than incandescent lights (about 29 cents per year). LED lights also last up to 20-times longer than incandescent lights, so you won’t have to replace them nearly as often.
Lumens
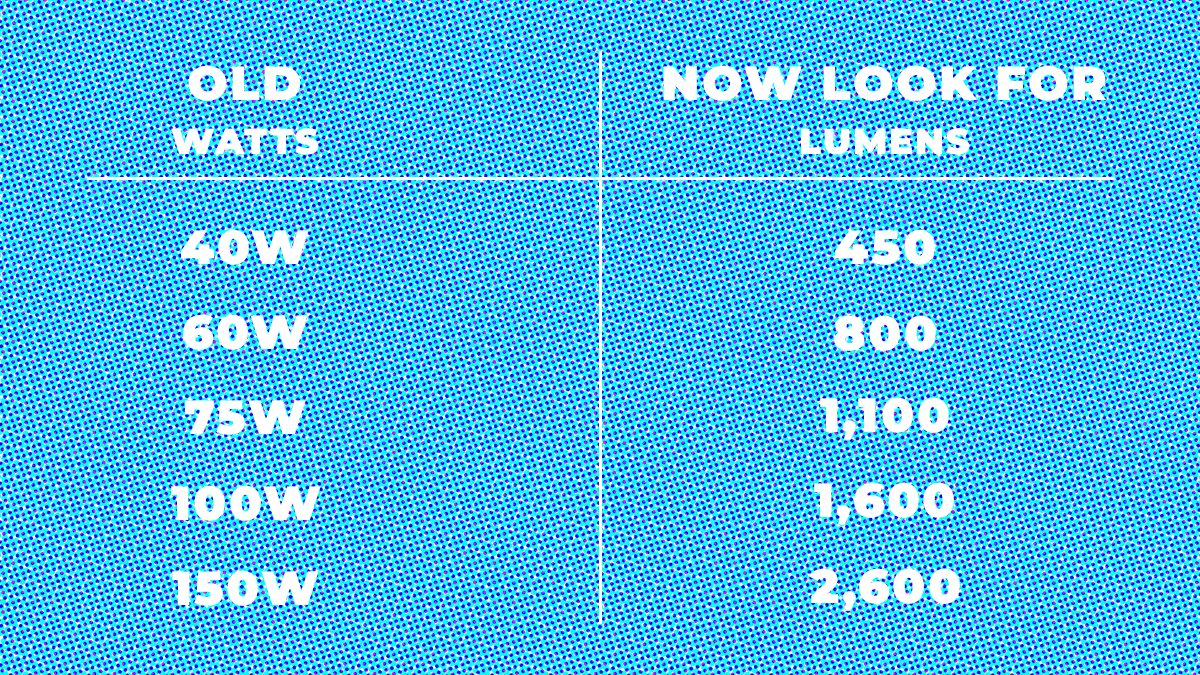
In the past, we bought bulbs based on the amount of energy, or watts, they use. However, today’s energy-efficient bulbs use up a lot less energy to give you the same amount of light. So, it makes sense to buy bulbs based on the amount of light, or lumens, they emit instead.
A lumen is simply a unit of measurement that describes the brightness or total quantity of visible light emitted by a source. And, if you know how many lumens you want and the area of your garage then picking the perfect light is easy.
As a rule of thumb, a well-lit garage requires 30 – 40 lumens per square foot of space. Therefore, a typical 24′ x 24′ two car garage will require between 17,280 and 23,040 lumens and a 12′ x 22′ single car garage will need between 7,920 and 10,560 lumens.
If a light fixture is rated at 4,000 lumens then you will need four or six to adequately light a two car garage and two to three for a single stall garage.
Correlated Color Temperature (CCT)
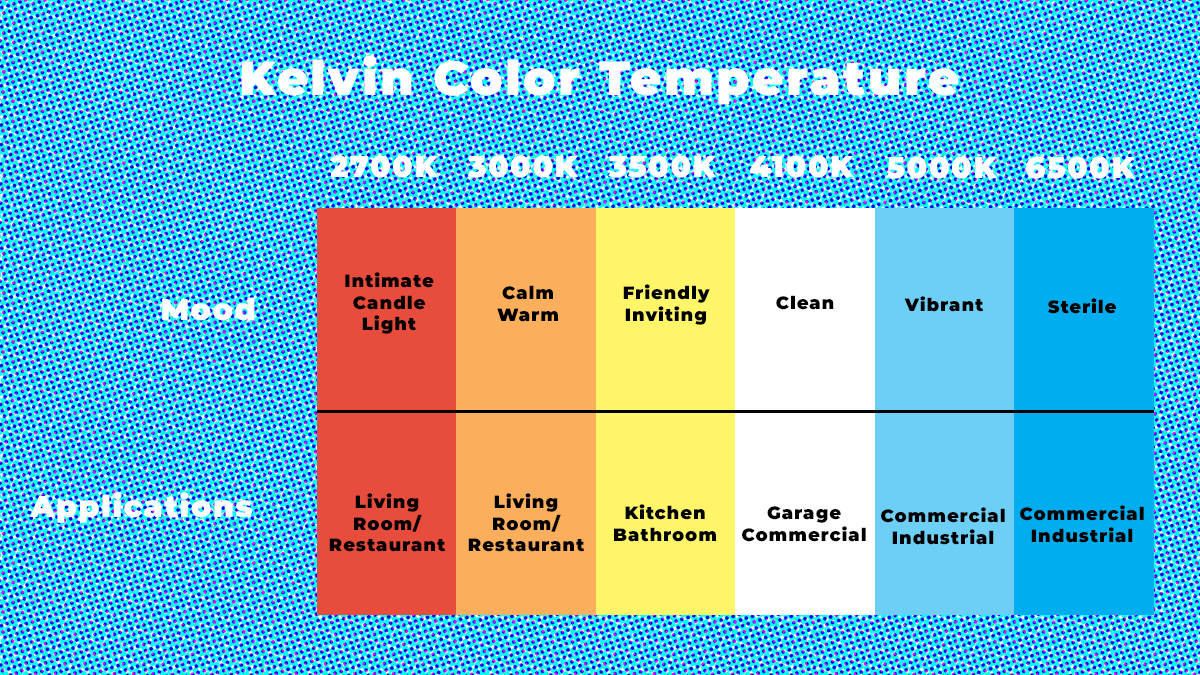
When we talk about color temperature we are talking about the property of white light, which is actually a mixture of all the colors of light.
Everything in the universe that has a temperature above absolute zero gives off some sort of electromagnetic radiation, whether that’s infrared, visible light, ultraviolet, X-Ray, and anything in between. Even humans give off radiation in the form of infrared energy or heat radiation.
As you increase the temperature of something, it will give off more and more heat or electromagnetic radiation. If you get it hot enough, it will start to glow and give off electromagnetic radiation in the form of visible light.
Continue raising the temperature and the glow will go through a specific range of colors that is mathematically described by Planck’s Law. This is what is meant by color temperature – it is the color of white that correlates to the color of light of a theoretical body at a certain temperature.
Color temperature is measured in Kelvin. The higher the Kelvin the “cooler” the light is and the inverse is true, a lower Kelvin corresponds to a “warmer” light. Standard incandescent bulbs produce light in the 3200 K range which tends to be yellow, while daylight balanced bulbs operate in the 5600 K range that looks bluer.
For most garage lighting solutions, a 4000 K or 5000 K color temperature light is recommended. This gives you a vibrant light without being too fatiguing or sterile.
Color Rendering Index (CRI)
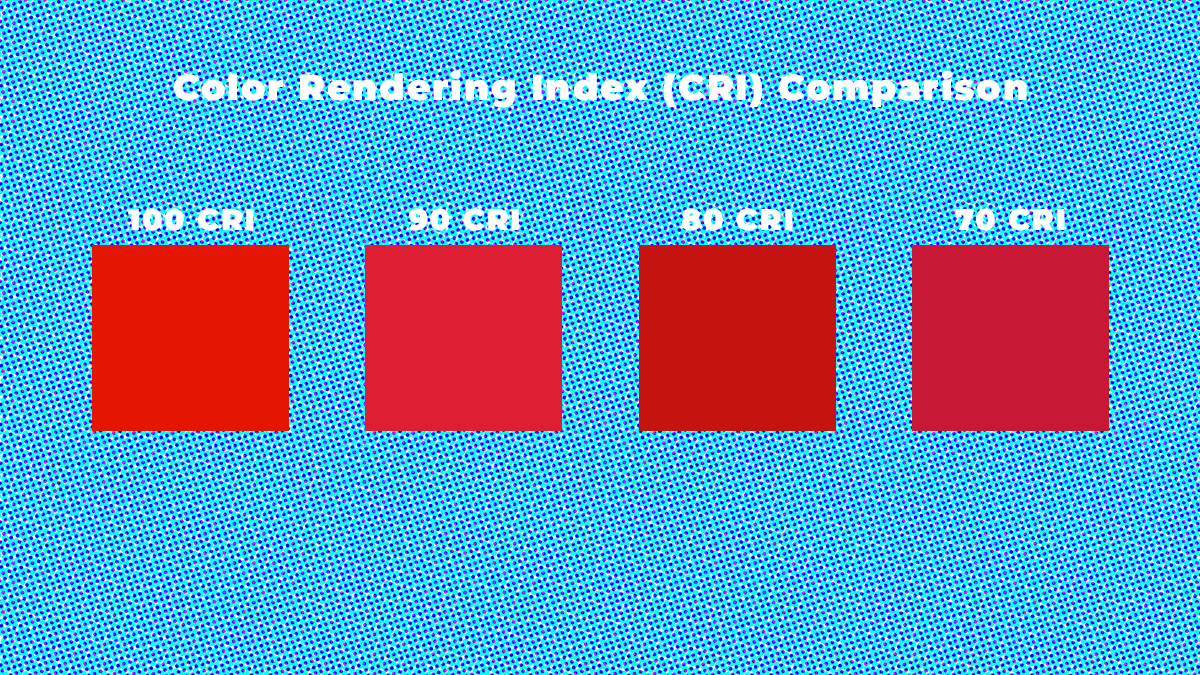
Color Rendering Index, or CRI, is a measurement of how well a light illuminates color and indicates how sharp and accurately a color will appear. The lighting industry uses CRI to represent the quality of light a lamp emits.
CRI is determined by comparing different light sources with the same color temperature against a reference source with a CRI of 100. The testing method evaluates the light sources ability to render 8 standard colors. The difference between the light reflected by the test source and reference source provides the numeric CRI value. The closer to 100 the better color will appear under it.
In some situations, a high CRI value is very important. For example, photographers and videographers require high CRI lighting so that their final product is accurate and consistent across all mediums.
For most garage lighting applications, however, a high CRI light is not necessarily needed. In such cases, the volume of light is more important than quality. Still, most Fluorescent and LED shop lights are rated around 80 CRI, which is still pretty accurate.
How To Install Your Garage Lighting
Garage shop light fixtures are installed by hanging them from suspension cables or attaching them directly to the ceiling. You will also need to consider whether your fixture has a plug or needs to be hardwired.
Regardless of the method, the techniques are usually pretty similar. In this section, I’ll outline a few standard steps but you should always consult the user manual that comes with your light.
Spacing Your Light Fixtures
Light fixtures should be evenly spaced to achieve the most consistent light coverage possible. Begin by measuring the length and width of your garage and divide it into even sections based on the number of fixtures you have.
Once you have your layout, start marking the ceiling or rafters where you’re going to mount your lights and drill holes using the appropriate bit.
Mount Hardware and Adjust
Most mounting hardware will consist of a ceiling hook or another proprietary solution for suspending your fixture. If you are not suspending your fixture from a cable or chain then mount it to the ceiling directly.
If you are hanging your fixture from a drywal ceiling without a stud you will need a drywall anchor to help secure the load. Simply press it into the hole you drilled previously then screw in your hook or other hardware. If you are attaching to solid wood or stud then you don’t need an anchor.
Once the hardware is mounted to the ceiling, make initial adjustments to the length of your suspension cable. To avoid damage to your light fixture, be sure to take head room and vehicle height into consideration.
Mount Fixture and Make Final Adjustments
At this point, attach your fixture to the mounting hardware and make final adjustments to height and ensure it is level. Finally, plug in your power cord or properly wire into your homes electicity and you’re all set.